Monday, January 12, 2015

Blustery Day Beef Stew

I started writing this in November, saved it, and promptly forgot about it. Until now...
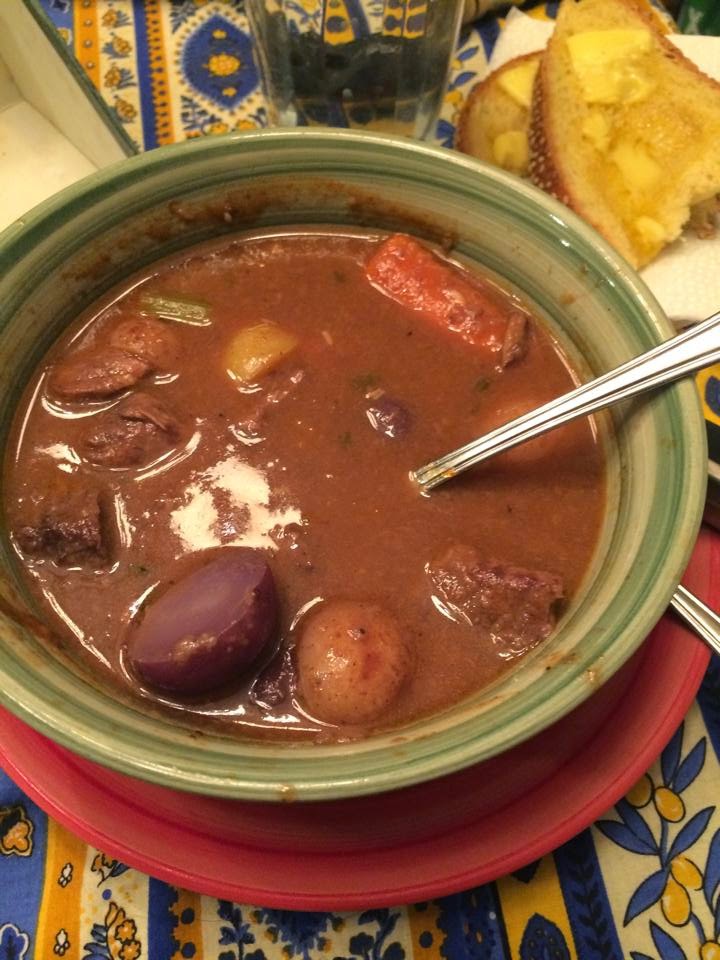
This was actually the next day, because I had it for dinner again!
Notice the semolina bread in the background..


Today was a perfect stew day. It was cold and overcast, with the feel of snow in the air. You know that feeling? Plus, my parents were coming home tonight from their well-deserved vacation in Florida, and I wanted to have something for them on the stove, that was not too time dependent. You never know how flights are going to go, so it needed to be something that would not dry out.

I started by looking at several beef stew recipes and then doing my own thing, as usual.  It is cooked in one pot, but there are a few steps involved. I prefer to use my cast iron faux Le Creuset, but that is in storage, so I just used a heavy-bottomed stock pot. Make sure your pot is one that will conduct heat evenly, because this stays on the stove for awhile.


Blustery Day Beef Stew

Ingredients
1 ½ pounds of stew meat
Several glugs of olive oil
2 Tablespoons butter
2-3 Tablespoons flour (for dredging)
Sea salt
Fresh ground pepper
2-3 sprigs fresh Thyme
2 cups of good dry red wine
1-2 boxes beef broth
2 Tablespoons tomato paste
Couple glugs Worcestershire sauce (optional)
3-4 garlic cloves, smashed
1 -2 medium onions, cut in chunks
3 celery ribs, cut into 1-inch pieces
3-4 carrots, cut into 1-inch pieces (I always wish I had more carrots!)
2 cups baby potatoes or 2-3 large potatoes peeled and chunked
(I don’t peel the baby potatoes, but will sometimes cut them in half)
½ bag frozen peas
Fresh parsley, for garnish

The Process
Either cut your beef into 1-inch cubes, unless like me, you bought it pre-cut at the Whole Foods butcher counter.  Start preheating some olive oil and the butter in the bottom of your pot on medium. Do not let it overheat/burn! The reason I do a butter/oil combo is because the butter helps the olive oil not to burn. In a shallow bowl or on a plate, mix a few tablespoons of flour with several turns of fresh ground pepper and a sprinkle of sea salt. I mix it with a fork, but however you do it, mix it altogether. Dredge each piece of meat in the flour...all sides. Then, and this is important, shake off the excess flour before popping the meat into the hot oil. If you don't, it will burn which = yuck.

Here's the thing about browning meat. Until I knew how to do it correctly, I fucked it up every time. AND I read about doing it correctly for years, but I did not believe what I read. I didn't believe the experts, people. Something is seriously wrong with me. But I digress. The key to browning meat is to leave it alone. Don't touch it. Don't try to pick it up if it is not ready to be picked up. When it's ready, it just slides right off the pan. I promise. The next part of that equation is to not crowd the pot. I don't know why that is, and I am sure someone does, but it’s true. Cook your meat in batches. As each batch is finished, take the meat out and put it in a bowl. You are not cooking this meat through, just browning, so it will be full of juices.  Do not lose these juices!

Now that you are finished browning the meat, deglaze the pot. That means you take a liquid and pour it into the hot pot and using a wooden spoon, scrape all the good bits off the bottom. If you are using red wine (yes, please) then now would be the time to use it. I take about approximately 2 cups of good dry red wine and pour it in, and then I add one of those boxes of beef broth.  The flour that you used to dredge the meat will help thicken this broth. Into this I stirred a couple tablespoons of tomato paste, 2 bay leaves, 3-4 smashed garlic cloves, a teaspoon of sea salt, several cracks of freshly ground pepper, and a few sprigs of fresh thyme. If you don't have fresh thyme, use 1/2 teaspoon of dried thyme. If I have Worcestershire sauce on hand, I throw in a few glugs of that.  The last time I made this, I didn't, so NBD. I let that come to a boil, and then turn it to simmer. Add in the chopped veggies and the beef (and its juices!) and make sure it is all submerged in liquid. If it is not, add more broth until it is. Cover the pot with a tight-fitting lid and let this simmer for at least an hour. 

Alternatively, you can pop the pot into the oven on 325 for 1-2 hours. Check in on it, whether in the oven or on the stove, to give it a stir and make sure that there is enough liquid in the pot. You want it to reduce down a bit, but not enough that you run out. If it is getting low, add some water or more broth. Taste the broth for a seasoning check and adjust, as necessary. I like to add frozen peas in the last 10-15 minutes. They add a nice pop of color and textural contrast.

**Slow cooker Option**
Brown the meat, but then throw everything, but the peas, into the slow cooker on low for 6-8 hours. If you want to do it on high, I am not sure...maybe Some people say to not add herbs until the end because the flavor will get intense, but I have found it to be fine with something like stew. And frankly, I am using my slow cooker for convenience and because I am generally not going to be home while it is on. 

If you want to make it pretty, sprinkle some fresh, chopped parsley on top of each bowl of stew.  The almost cruel fact about beef stew is that, as much time and effort as it takes to make, it actually tastes even better the next day. The flavors have had a chance to meld and deepen. But, this will still be delicious, and it makes so much that you will be able to take some to work the next day and make all your co-workers drool over your lunch. 

Sunday, October 13, 2013

Browned Butter Butterscotch Brownies

Do you need a delicious, easy, relatively quick go-to dessert?  These bars are it.  They are bar cookies, but my little one calls them butterscotch brownies.  Whatever you decide to call them, they are pretty amazing!  Bonus?  They are easy enough to mix by hand so I don't need to pull out my kitchen aid mixer.

I first found this recipe in a novel.  They are called Butterscotch Bonanza Bars.  I like to read mystery series, especially ones with cooking themes.  The Hannah Swensen series by Joanne Fluke is a bit fluffy for my usual reading taste, but the recipes are amazing.

I only made one change to the author's recipe, but I think it makes a big difference.  Instead of simply melting the butter, as originally called for, I brown it.  You know I am a little obsessed with brown butter, but using it in this recipe is a match made in heaven.
the mixed butter and sugar

Ingredients
½ cup salted butter
2 cups light brown sugar
2 teaspoons baking powder
1 teaspoon salt
1 teaspoon vanilla
2 eggs, beaten
1½ cups flour
1 cup chopped nuts (optional)

2 cups butterscotch chips or flavor of choice (you can even mix flavors)

Directions
                   
                        I sprinkle the baking soda
                             and salt all over.
                  Then mix.
Preheat oven to 350.  Butter and flour a 9x13 pan. Brown the butter.    Add brown sugar and stir well. Mix in baking powder and salt; stir in vanilla and eggs. Add flour by ½ cup increments, stirring in each half cup before adding the next. Stir in nuts and chips.
Spoon batter into the and smooth it out. Bake at 350 for 20-25 minutes. Cool completely before cutting. 

Helpful hints
  • If you have dark brown sugar, mix 1 cup dark brown sugar and 1 cup white sugar. You can make brown sugar by mixing molasses into white sugar until it’s the right color.  I have done both of these and have everything come out great.  
  • If you are too nervous about the brown butter bit, you still need to melt the butter.  That is part of the beauty of this recipe.  You are already melting the butter.  Just take it to that next level.  I promise, you can do this.  I found that using a pan, not a pot, speeds the process.  It won't take nearly as long as when browning 2 sticks of butter for cookies.  It's still worth it for the cookies, by the way.
  • Feel free to get creative with the chip/nut combos.  I have made these with no chips or nuts; chips only; nuts only; butterscotch only; chocolate only.  And I rarely use 2 cups of chips.  I kind of eyeball it.  Or see what I have left in the pantry.  
  • You really do need to let these cool completely.  
  • The pan I like to use is a tad smaller than a 9x13.  I need to cook these for about 30-35 minutes.  The edges get incredibly and deliciously crispy.  If I think they are going to get burned, I turn down the oven to 325. 
I had a handful each of butterscotch and mini chocolate chips.
Ta Da!  And yes, those crispy edges taste even better in real life.  


Thursday, October 10, 2013

new posts coming soon!

gasp!  I am writing here?  Yes, yes I am.  It is coming into the cooler weather, or cooking and baking season in my house.  Recipes and pictures will come soon.  For now I will tantalize you with the thought of Brown Butter Butterscotch Bars.  I altered a favorite recipe of mine and wow.  Let's just say that I cut them and divvied them into bags to share with colleagues, etc. so that I could not eat them all. I even did that before I took pictures.  That just means I need to make them again.  Plus, I usually add nuts and I made these nut-free so I could take them to school with me.

See you soon friends!

Sunday, July 28, 2013

Come check me out...

...over at the Camp Riverbend page.  I have been posting this summer's recipes there.  If I have energy and time I will post them here, too.


Sunday, March 17, 2013

Corned Beef and Cabbage, Slow Cooker Style

My first foray into cooking corned beef was terrible.  It both looked and tasted what I imagine an old piece of shoe leather tasted like.  I think I overcooked it by about, well, 2 hours.  Maybe more.  I went back to letting other people, who knew who to cook corned beef, do so for the next couple years.  Last year I made corned beef again, traditional style on the stove.  It came out great and was delicious!

This year I decided to go the slow cooker route, because, let's face it, the slow cooker makes my life easier.  I looked up a bunch of recipes and most of them called for a bottle of beer, which I didn't have. I found Martha Stewart's recipe and decided to use that one.  I modified it a bit out of necessity.  I was out of thyme, both fresh and dry, as well as celery.


Slow Cooker Corned Beef
Small bag of carrots, peeled and cut into 3
Several small red potatoes, washed and quartered
1small onion, cut into 6 wedges, root intact (so the pieces don't fall apart)
Head of cabbage, outside leaves removed, cut into wedges
beef brisket with pickling spice packet
I added a nice big bay leaf

Add the vegetables, except for the cabbage, and then put the corned beef in, fat side up.  Sprinkle the spices on top.  Add water, almost to the top of the beef.  
Cook on high for 4 hours.  After the 4 hours, skim the top.  I had to remove the veggies in order to make room for the cabbage.  I put them all in a bowl with a few cups of the liquid.  Add the cabbage and submerge in the liquid.  Cook for another 45 -60 minutes.  Remove the beef and let it sit for 15 minutes.

I trimmed all the visible fat off  and then sliced as thinly as possible, against the grain.  
I served it with all the vegetables, rye bread, and mustard.  
hmm...I am having trouble rotating this picture.

As you see in the picture above, I also had Irish Soda Bread.  I made that with Lilly this afternoon, using a friend's recipe.  It was delicious!


Tuesday, February 12, 2013

Meatless Meals

I know a lot of people have been posting vegan and vegetarian recipes recently.  I am neither, though I did eat mostly vegetarian for a long time many years ago.  Unfortunately, I just like steak.  So I started eating it again and have not looked back.

I do try to eat meatless a few meals a week, though.  There is a great lentil recipe I got from someone that is so delicious it seems like it shouldn't be as good for you as it is.  My fave meatless meals generally revolve around eggs: homemade french toast, cheesy eggs, or quiche.  This past Monday I threw together a yummy broccoli cheddar quiche and served it alongside a mixed greens salad with a nice balsamic dressing.

What are some of your favorite meatless meals?  Comment below if you are interested in the recipe and I will add it.


Sunday, January 27, 2013

Home made play dough


As you might remember, I worked at a summer camp teaching cooking.  Today I went back to work during an open house event and I made play dough with the potential campers.  We had a lot of fun and they were able to take home a little bit of dough, too!  It reminded me of this blog post I wrote in my other blog in October 2011.  Enjoy!


Today promised to be a rainy day so our plans to meet our friends at the park had to be modified.  My friend Colleen and I decided to bring the kids to the diner for an early lunch.  You might be thinking that we are crazy, and when I saw the line at the diner door I truly believed we were.  Luckily I was able to get in rather quickly and the owner of the Parkwood Diner sat us in the very back.  Smart man.

One of my tried and true techniques for keeping Lilly occupied when we are at a restaurant is to bring playdoh for us to use.  I realized about an hour before our meeting time that we were fresh out of playdoh.    This is when being a preschool teacher has its advantages.  I pulled up my recipe for playdough and in about 15 minutes from start to finish we had enough playdough for three kids.

Here is the recipe I used.  I will put my notes in italics.


Ingredients
2 cups flour
2 cups warm water (I used pretty hot water.)
1 cup salt (I think I used a little too much salt because it was a bit more gritty than usual.  Lilly was helping measure so it was not exact.)
2 TBSP vegetable oil
1 TBSP cream of tartar
food coloring  (I only had gel food coloring and it was hard to work into the dough.  The liquid is best.)
flavor extracts (I didn't have any so I didn't use any!) 

Mix all the ingredients in a medium pot and stir over low heat.  (I had mine a bit high because I forgot and didn't have the instructions in front of me.  It still came out okay.)  Keep cooking and stirring until it pulls away from the pot and starts to look and feel like playdough.  Put it onto a clean surface (I used my silpat.) and when it is cool enough knead the dough until it is smooth.  I divided the dough into four and made a little divet in each pile before adding food coloring.  If you are worried about staining your hands then use gloves or even wrap it in plastic wrap and knead it in there.  (With my students I used to put it in a ziplock, take the air out and let them squish away.)  

Store in airtight containers or ziplock bags.

This is a very forgiving recipe.  If it is too sticky, cook it longer.  If it starts to dry out, add a few drops of water and work it in.  If it's too wet, cook it a little bit.  I let Lilly help me and she was as thrilled to help me make the playdough as she was to play with it.  And just think of all the math and science your little ones will be learning without even realizing it!