Tuesday, August 28, 2012

Browned Butter (and cookies to make with it)

My lovely mixer in action.  


In the few weeks since camp I have been making rather regular and kind of ho-hum dinners.  Nothing to write home, or here, about.   However, I did discover extraordinary chocolate chip cookies.  What makes these cookies so extraordinary?  Three things...bread flour, sea salt, and browned butter.  What is bread flour?  I wasn't sure but when I looked it up I discovered it has more gluten than all-purpose flour.  More gluten = chewier.  Chewier cookies are a plus in my book.  Sea salt, I know and love, especially with chocolate.  But I had never browned butter before.  I thought I had done so before when I was trying to make a browned butter and sage sauce for pumpkin ravioli last fall.  Apparently I was wrong.  I had only made melted butter and sage sauce I guess.

I followed some directions I found but I still was not sure if I was doing it correctly until Ta-Da! browned butter it was!  A few people have asked me about the process so I decided to take some pictures the next time.  Sure, you can find plenty of recipes and blogs that give you browned butter tutorials, but since you are reading this blog, you can find it here, too!  See?  I aim to please.

This is the link to the recipe I used to bake the cookies.  They are quite delicious as is, but I think next time I will use dark brown sugar versus light brown, just to see.  According to Alton Brown, the darker the sugar, the chewier the cookie.  There are actually TONS of recipes out there in blog land for sea salt browned butter cookies.  I kind of randomly found this one after not being able to re-find the original recipe I had planned to use.  Plus, I had all the ingredients, so, you know, that's a bonus.

**********UPDATE**********
I have made the cookies several times now.  I really like the dark brown sugar because of the depth of flavor it gives, plus they get nice and chewy.  The first few times I made them they got pretty crispy.  They were delicious but not chewy.  So I had to play around with the time and really look at them a few times until I figured out what worked to make them chewy and still a little crispy on the outside.  I found that when they look almost done....like they still might be almost runny on the inside...I pull them out.  I let them sit on the cookie sheet on the top of the stove for a few minutes, until set.  If you try to move them now they will fall apart.  Then let them cool on a cooling rack.  To me, these are perfect with a cup of coffee.  Enjoy!
You can see the few sprinkles of coarse sea salt.

Up close and personal


Here we go...
For some reason it is sideways, but for this recipe use unsalted butter.


Cut the butter into tablespoon-sized pieces for more even melting and put into a small pot over medium heat.


Whisk it occasionally.  


It gets nice and frothy and still smells buttery.


Then it boils.  Like serious boiling!!!


At this point I was wondering when this so-called browning would occur.  Had I missed it?  This had been on the stove for almost 10 minutes already!  Eventually, it keeps boiling, you keep whisking once in a while, and around then you start to smell the MOST amazing nutty smell.  At the same time you will see brown bits at the bottom of the pot.  That's how you know it's now browned butter.  I was going to let it go a little further to see how brown I could take it, but I was afraid to burn it and I needed this butter to make the cookies!  

Do not be afraid of the browned butter.  I want to use it in everything now because it gives such a depth of flavor to whatever you are putting it in.  I would love if you make it, if you would come back here and leave me a comment to let me know!


Tuesday, August 14, 2012

Popcorn Balls

Stove top popcorn
For the last week of camp I decided to have fun with the campers and piggyback onto the Carnival Day that was being held on that Thursday.  We made popcorn balls which I had never made before, but I will most definitely be making again!


We started out with making popcorn on the stove, which is the only way I make it.  If I had an air popper I would use it.  But I do not eat microwave popcorn. In my opinion, if you are eating popcorn there should only be ingredients that you can read and pronounce:  oil, popcorn kernels, butter and salt. Back to the recipe... We made the popcorn and did not salt or butter it.
Kernels and canola oil before the lid went on.


For the sauce that allows you to make the popcorn into balls:
Melt 1/2 stick of butter in a large pan.

Add 1/4 cup brown sugar and a 10 oz bag of mini marshmallows.  Interesting note about the mini versus regular sized marshmallows is that the mini melted faster and more evenly.  But the regular sized got more caramel-y because they had to cook longer.  I kind of preferred the larger ones for that reason but it was hard to balance the melting and not burning it.  


Stir constantly over medium heat until it is all melted.  Make sure to scrape the bottom of the pan because that is where it will start to caramelize and eventually burn.  I started off the week having the campers stir this, but their last week giddyness was making me nervous so I put an end to that.  If you are doing it with your children, just make sure they are safe because sticky and boiling is not a good combination if it gets on skin.  

Pour the goodness over the popcorn.  I transferred the popcorn to a different bowl so that I could try to keep as many unpopped kernels from going in as possible.  Also, a plastic bowl is a better choice than a metal one, just saying.  Not that I burned myself on the metal bowl that was filled with molten marshmallows or anything.

It tastes as amazing as it looks.

At this point you butter your hands and get to work very quickly and carefully forming balls.  For the campers, I put a large spoonful in front of them on a clean table top and had them wait a minute or so before touching it.  I experimented with packing them tightly or keeping them looser.  I enjoyed them a little looser because it made it a little easier to bite into.  I have no pictures of the balls because my hands were a sticky mess.  The campers had a blast making and eating them.  All different shapes were made: hearts, flowers, squares.

I can definitely see myself experimenting with add-ins, like pecans in the near future.  I was even thinking I could break it into clumps and let it cool on a silpat.  That would be a fun gift if you put it in decorative bags or tins.  My first plan?  Make them small and dip them into melted dark chocolate.


Friday, August 10, 2012

Indian Basmati Rice

Holy cow was this delicious!  I must preface this by saying that I was never a rice fan until recent years, when I learned how to make rice tasty.   Rice to me was always something of a bland side dish, only gaining flavor if I smothered it in some kind of sauce.  My Columbian co-workers taught me how they made rice and once I adopted their techniques, I never looked at rice the same way again.

Back to the post at hand...
For camp last week we made Indian Basmati Rice.  I had never made a rice that was as seasoned as this, but I have eaten it at restaurants and loved it.  Basically, once you have the spices, it is super easy.

the spices used

The first thing you MUST do is soak the rice to get rid of the starchiness.  The recipe called for soaking it once, but I had heard while watching Food Network's Aarti Party that you should do so a few times until the water is no longer cloudy.  (Or perhaps I imagined this, but I am pretty sure she said that.)
soaking rice
Add oil to the pot with the spices and let heat for a minute or two.  Add the thinly sliced onions and cook until lightly browned.  This takes several minutes, but it is so worth being patient.  The browned onions give such depth to the flavor.
Not yet browned.

Add the rice and cook until toasted, just a few minutes.  Add the salt and water, bring to a boil.  Cover and simmer.  Seriously, it is that easy and so delicious!  At camp we topped it with curried vegetables (which I did not love, hence no recipe) and when I made it at home I topped it with my slow cooker pulled chicken.  Lilly loved it so much she did not even notice the cumin seeds or the onions!

After cooking, before fluffing with a fork.

Indian Basmati Rice recipe from All Recipes
Ingredients
  • 1 1/2 cups basmati rice
  • 2 tablespoons vegetable oil
  • 1 (2 inch) piece cinnamon stick
  • 2 pods green cardamom
  • 2 whole cloves
  • 1 tablespoon cumin seed
  • 1 teaspoon salt, or to taste
  • 2 1/2 cups water
  • 1 small onion, thinly sliced

  • Directions
Place rice into a bowl with enough water to cover. Set aside to soak for 20 minutes.
Heat the oil in a large pot or saucepan over medium heat. Add the cinnamon stick, cardamom pods, cloves, and cumin seed. Cook and stir for about a minute, then add the onion to the pot. Saute the onion until a rich golden brown, about 10 minutes. Drain the water from the rice, and stir into the pot. Cook and stir the rice for a few minutes, until lightly toasted. Add salt and water to the pot, and bring to a boil. Cover, and reduce heat to low. Simmer for about 15 minutes, or until all of the water has been absorbed. Let stand for 5 minutes, then fluff with a fork before serving.

Monday, August 6, 2012

Baked samosas


No, not Mimosas or even Samoas, but tasty treats, nonetheless.  If you don't know what they are, samosas are an Indian food, like a little pastry pocket of goodness.  Traditionally they are fried, and deliciously so, but I chose a baked version wrapped in phyllo dough.

It was an interesting introduction for me this week into the world of fragile doughs.  I had never used phyllo before due to the fear factor.  And frankly, I don't find it to be very tasty on its own.  It was fun to hear what the kids thought it was: tissues, paper, napkins.  I was having a difficult time with handling it until one of the counselors, who was a chef before he became a teacher, showed me what to do.  Thank you!!!!

We made a baked vegetarian samosa using potatoes and peas.  Baking instead of frying makes them a lot healthier and tasted just as god.  I was happily surprised at how many campers really liked them, especially since most said they had never had Indian food before.


The spices added
Cilantro 
The mixture before being added to the dough.

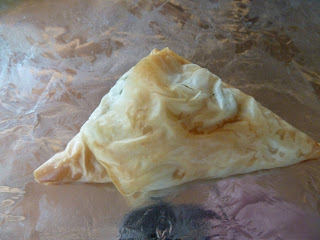
Baked vegetarian samosas 

Ingredients:

2 onions, minced
1 tbsp coriander
1 tsp cumin
1/4 tsp cayenne pepper
1/2 pound potatoes, chopped into 1/2 inch pieces
1 10 ounce package frozen peas, thawed and drained
1/4 cup chopped fresh cilantro
1/4 tsp fresh ground black pepper (or to taste)
1/2 tsp salt (or to taste)
9 sheets phyllo pastry, thawed
olive oil

Preparation:
Pre-heat oven to 400 degrees.
In a large skillet over medium high heat, sautee the onions in a bit of oil until they are soft, about 6 to 8 minutes. 
Add the coriander, cumin and cayenne, and cook for another minute.  Add the potatoes and cook for an additional 6-8 minutes.  Remove from heat and add the peas and cilantro, stirring to mix well. Season with a bit of salt and pepper.
Stack 3 or 4 sheets of phyllo together, and slice into 4 even rectangles with a pair of kitchen shears. Or a very sharp chef knife. Continue with the rest of the phyllo, then cover with plastic wrap or a lightly damp towel.  Place a tablespoon or two of the potato and peas mix in a corner of the dough, then roll the corner towards the center. Fold in the left and right corners, then roll up again.
Place each samosa on a baking sheet, and lightly brush the tops with olive oil. Bake for 20 minutes, or until lightly golden brown.
Recipe was adapted from one I found on About.com.  
About a tablespoon of mixture on the dough
Fold over into a triangle
Brush lightly with olive oil to seal and to brown.


I think that I will write a separate post for the rice I made with my older campers.  It was so delicious that it deserves its own post!